I’m not going to pretend I’ve always been good at difficult conversations. In fact, I’ve been spectacularly bad at them. There was a time I avoided them so long that a small issue became a team-wide problem that took months to repair.
The cost of avoiding hard conversations doesn’t disappear. It just compounds interest. Like technical debt, but for relationships.
Over the years, I’ve developed a simple framework that I come back to when emotions are high, trust is low, and the stakes actually matter. It’s not about being tough. It’s not about being soft. It’s about being grounded enough to say what needs to be said while keeping your humanity and your authority intact.
The Framework at a Glance
Before we dive deep, here’s the bird’s eye view:
flowchart TD
    A[Get Clear on Your Why] --> B[Separate Facts from Stories]
    B --> C[Own Your Part]
    C --> D[Name the Pattern]
    D --> E[Draw a Clear Line]
    E --> F[Give Real Options]
    F --> G[Close with Resolve]

    style A fill:#2d5a27,stroke:#1a3518,color:#fff
    style B fill:#4a7c59,stroke:#2d5a27,color:#fff
    style C fill:#6b9b7a,stroke:#4a7c59,color:#fff
    style D fill:#8cb99b,stroke:#6b9b7a,color:#333
    style E fill:#aed7bc,stroke:#8cb99b,color:#333
    style F fill:#d0f5dd,stroke:#aed7bc,color:#333
    style G fill:#e8fff0,stroke:#d0f5dd,color:#333
Now let’s unpack each step.
Step 1: Get Clear on Your “Why”
Before I talk to anyone, I remind myself why this conversation matters. Not to win. Not to prove a point. Not to make myself feel better about being “the boss.”
The purpose is always to protect the mission, the team, and the standard.
If I can’t articulate why the conversation is necessary, I’m not ready to have it yet. Simple as that.
mindmap
  root((Your Why))
    Protect the Mission
      Team goals
      Business outcomes
      Client commitments
    Protect the Team
      Culture
      Morale
      Trust between members
    Protect the Standard
      Quality expectations
      Professional behavior
      Accountability
Pro tip: When I open the conversation, I say this out loud. I tell them the intent. Something like, “I’m having this conversation because I care about where we’re going as a team, and something isn’t working.”
This lowers defensiveness immediately. People don’t need softness. They need clarity.
Step 2: Separate Facts from Stories
This is where most difficult conversations go sideways. We mix what actually happened with the story we’ve told ourselves about what happened.
I stick to observable facts:
Dates - when things happened
Actions - what was specifically done (or not done)
Outcomes - the measurable result
I avoid assumptions and labels. The difference sounds like this:
Story (Avoid)
Fact (Use)
“You don’t care about this project.”
“This deadline was missed three times, and no update was sent.”
“You’re being difficult.”
“In the last three meetings, you left before the discussion ended.”
“You’re not a team player.”
“The shared document hasn’t been updated in two weeks.”
Facts keep the conversation grounded. Stories inflame it.
flowchart LR
    subgraph Stories["Stories - Avoid"]
        S1[Assumptions]
        S2[Labels]
        S3[Mind-reading]
        S4[Generalizations]
    end

    subgraph Facts["Facts - Use"]
        F1[Dates and Times]
        F2[Specific Actions]
        F3[Measurable Outcomes]
        F4[Observable Behaviors]
    end

    Stories -.->|Replace with| Facts

    style Stories fill:#ffcccc,stroke:#cc0000
    style Facts fill:#ccffcc,stroke:#00cc00
Once the facts are on the table, I explain the impact. How it affects the business. The team. Trust. Momentum. Honest, but not dramatic.
Step 3: Own Your Part
This is where leadership credibility is built. Not in the power you wield, but in the responsibility you take.
Before pointing fingers, I ask myself:
Where did I fail to set clear expectations?
Where did I tolerate behavior too long?
Where did I step in too late?
I say this out loud. Not as an apology for having standards, but as ownership.
pie showData
    title "The Ownership Split"
    "Their responsibility" : 60
    "Your role in setting context" : 20
    "System/process gaps" : 15
    "Communication clarity" : 5
Here’s the truth: people are more willing to take responsibility when they see you doing the same. Vulnerability isn’t weakness. It’s modeling the behavior you want to see.
Step 4: Name the Pattern, Not Just the Incident
One-off mistakes are normal. Patterns are a leadership issue.
When something has happened more than once, I make it clear that this is no longer an isolated event. This is crucial because it helps people understand:
Why the conversation is happening now
Why it matters
Why consequences may be different this time
timeline
    title The Pattern Recognition Timeline
    section First Instance
        Week 1 : Deadline missed
              : Quick chat
              : It happens
    section Second Instance
        Week 4 : Deadline missed again
              : Formal feedback
              : Clear expectations set
    section Pattern Emerges
        Week 8 : Third deadline missed
              : This is the conversation
              : Pattern named explicitly
Avoiding this step is how leaders end up “surprising” people with consequences later. Nobody should be blindsided by a performance conversation or termination. If they are, that’s on you.
Step 5: Draw a Clear Line
This is the hardest part, and the most important.
I explain what cannot continue. Then I explain what “good” looks like going forward. I don’t leave it vague. I don’t outsource accountability to feelings or intentions.
flowchart TB
    subgraph Current["What Cannot Continue"]
        C1[Missing deadlines without communication]
        C2[Arriving late to client meetings]
        C3[Bypassing the review process]
    end

    subgraph Future["What Good Looks Like"]
        F1[24-hour advance notice if timeline slips]
        F2[5 minutes early to all external meetings]
        F3[All code through PR before merge]
    end

    Current --> |Transform to| Future

    style Current fill:#ffe6e6,stroke:#cc0000
    style Future fill:#e6ffe6,stroke:#00cc00
Clarity is kindness, even when it’s uncomfortable. Vague expectations are unkind because they set people up to fail without knowing it.
Step 6: Give Real Options
People need agency. Even in difficult conversations, they should feel like they have a path forward, not that they’re being pushed into a corner.
I outline the actual paths available:
flowchart TD
    A[Current Conversation] --> B{Path Forward}

    B --> C[Improvement Path]
    C --> C1[Clear conditions for success]
    C --> C2[Defined timeline]
    C --> C3[Regular check-ins]
    C --> C4[Full support provided]

    B --> D[Exit Path]
    D --> D1[Dignified transition]
    D --> D2[Clear timeline]
    D --> D3[Reference discussion]
    D --> D4[Mutual respect maintained]

    style A fill:#4a5568,stroke:#2d3748,color:#fff
    style B fill:#6b46c1,stroke:#553c9a,color:#fff
    style C fill:#38a169,stroke:#276749,color:#fff
    style D fill:#dd6b20,stroke:#c05621,color:#fff
Sometimes that’s improvement with clear conditions. Sometimes it’s a clean exit. Either way, the options are respectful, fair, and honest.
False hope helps no one. Ever.
Step 7: Close with Resolve, Not Anger
I don’t rush to fill silence. I don’t argue. I let the weight of the conversation land.
Then I set:
A clear next step
A clear timeframe
A commitment to follow through
sequenceDiagram
    participant Leader
    participant Team Member

    Leader->>Team Member: States expectations clearly
    Team Member->>Leader: Acknowledges or asks questions
    Leader->>Team Member: Answers questions without retreating
    Note over Leader,Team Member: Silence is okay here
    Leader->>Team Member: Sets next step and timeframe
    Team Member->>Leader: Confirms understanding
    Leader->>Team Member: Commits to follow through

    Note over Leader,Team Member: Meeting ends

    Leader-->>Team Member: Actually follows through
The last part, actually following through, is what separates real leaders from people who just have difficult conversations as a performance.
Bringing It All Together
Here’s the complete framework in one view:
flowchart TD
    subgraph Preparation["Before the Conversation"]
        P1[Know your why]
        P2[Gather facts, not stories]
        P3[Acknowledge your part]
    end

    subgraph Conversation["During the Conversation"]
        C1[State intent clearly]
        C2[Present facts, explain impact]
        C3[Own your contribution]
        C4[Name the pattern]
        C5[Draw the line]
        C6[Offer real options]
    end

    subgraph Closure["Ending the Conversation"]
        E1[Allow silence]
        E2[Set next step]
        E3[Define timeframe]
        E4[Commit to follow through]
    end

    subgraph AfterMath["After the Conversation"]
        A1[Document what was agreed]
        A2[Actually follow through]
        A3[Provide support if improvement chosen]
        A4[Check in at agreed intervals]
    end

    Preparation --> Conversation
    Conversation --> Closure
    Closure --> AfterMath

    style Preparation fill:#2d5a27,stroke:#1a3518,color:#fff
    style Conversation fill:#4a7c59,stroke:#2d5a27,color:#fff
    style Closure fill:#6b9b7a,stroke:#4a7c59,color:#fff
    style AfterMath fill:#8cb99b,stroke:#6b9b7a,color:#333
Final Thoughts
Difficult conversations aren’t about being tough or soft. They’re about being grounded, responsible, and human, while protecting what matters.
Motivation doesn’t come from avoiding hard truths. It comes from knowing where you stand, what’s expected, and that your leader is willing to do the hard work too.
If you can do that, people may not always like the conversation. But they will respect it.
And respect is the foundation everything else is built on.
What’s your approach to difficult conversations? I’d love to hear what’s worked for you in the comments.
Disclaimer: Content is accurate at the time of publication, however updates and new additions happen frequently which could change the accuracy or relevance. Please keep this in mind when using my content as guidelines. Please always test in a testing or development environment, I do not accept any liability for damages caused by this content.
Transform Claude from a code assistant into your autonomous development team.
Gone are the days of copy-pasting code snippets from AI chatbots. Claude Code represents a paradigm shift: an autonomous coding agent that reads your codebase, runs commands, manages git, and writes production-ready code—all while respecting the guardrails you define.
But here’s the thing: Claude Code out-of-the-box is powerful. Claude Code with proper setup? That’s a different beast entirely.
This guide walks you through building a production-grade full-stack application (React + FastAPI + MySQL) with a comprehensive Claude Code configuration. You’ll learn to implement:
MCP servers for real-time type checking and documentation lookup
Hooks that catch bugs before they’re committed
Skills that encode your team’s patterns and standards
Multi-agent architectures that optimize for both cost and quality
Let’s build something that actually works.
The Stack
Before we dive in, here’s what we’re working with:
Layer
Technology
Backend
Python 3.11+, FastAPI (async), SQLAlchemy 2.0
Frontend
React 18, TypeScript (strict), Vite, Tailwind CSS
Database
MySQL 8.0
Infrastructure
Docker Compose, Nginx, Celery + Redis
Testing
pytest (backend), Playwright (E2E)
1. Project Foundation
Docker Compose: Your Development Stack
Everything runs in containers. This gives Claude Code a predictable environment to work with.
services:mysql:image:mysql:8.0healthcheck:test:["CMD","mysqladmin","ping","-h","localhost"]interval:10stimeout:5sretries:5backend:build:./backendvolumes:-./backend:/appdepends_on:mysql:condition:service_healthyfrontend:build:./frontendvolumes:-./frontend:/app-/app/node_modules# Exclude node_modules from mountcommand:npm run dev -- --host
Key insight: Health checks matter. Claude Code will attempt to run tests and queries—if services aren’t ready, you’ll get confusing failures.
CLAUDE.md: Your Project’s Constitution
The CLAUDE.md file is auto-loaded into every Claude Code session. Think of it as onboarding documentation for your AI teammate.
# Project Name - AI Assistant Guide## Critical Rules1.**Read before edit** - Always use Read tool first
2.**Models require:**`__table_args__ = {'extend_existing': True}`3.**DB naming:** Tables=PascalCase, Columns=camelCase
4.**Money:** Use `Decimal`, never `float`5.**Auth:** HttpOnly cookies (not localStorage)
6.**Quality:** Run `make quality` after every change
## Essential Commands
| Command | Purpose |
|---------|---------|
| `make up` | Start all services |
| `make quality` | Lint + typecheck + tests |
| `make test-backend` | Run pytest |
| `make test-e2e` | Run Playwright tests |
## MCP Tools (Use These)
| Tool | When to Use |
|------|-------------|
| `mcp__language-server-python__diagnostics` | Before/after Python edits |
| `mcp__language-server-typescript__diagnostics` | Before/after TypeScript edits |
| `mcp__context7__*` | Library documentation lookup |
Keep it concise. As Anthropic’s best practices note: “A single file that’s hundreds of lines long should trigger a review; Claude can always look at additional details on demand.”
2. MCP Server Integration
MCP (Model Context Protocol) servers extend Claude’s capabilities with real-time tools. Here’s the configuration that makes everything work.
These are game-changers. Instead of Claude guessing at types and hoping for the best, it can:
# Before ANY code change:
mcp__language-server-python__diagnostics -> Check existing errors

# After EVERY code change:
mcp__language-server-python__diagnostics -> Catch new errors immediately
This catches issues during the coding session, not after a failed build.
Context7: No More Hallucinated APIs
Claude’s training data has a cutoff. Context7 solves this by fetching live documentation:
# Step 1: Find the library
mcp__context7__resolve-library-id("fastapi")

# Step 2: Get current docs
mcp__context7__get-library-docs(library_id, topic="dependency injection")
This is crucial for frameworks that evolve quickly. No more from fastapi import Depends when the API changed six months ago.
Database MCP: Schema at Your Fingertips
Instead of Claude reading model files and inferring relationships:
# Direct schema inspection
mcp__mysql-db__describe_table("User")
mcp__mysql-db__list_tables()

# Verify data during debugging
mcp__mysql-db__query("SELECT COUNT(*) FROM Reservation WHERE status = 'pending'")
This is faster and more accurate than parsing Python models.
3. Hooks: Your Automated Guardrails
Hooks intercept Claude’s actions and enforce quality gates. They’re the difference between “it works on my machine” and “it works.”
graph LR
    A[Claude Edits File] --> B{Post-Edit Hook}
    B -->|Lint Check| C{Pass?}
    C -->|Yes| D[Continue]
    C -->|No| E[Feedback to Claude]
    E --> F[Claude Fixes]
    F --> A

    G[Claude Commits] --> H{Pre-Commit Hook}
    H -->|.env check| I{Pass?}
    I -->|Yes| J[Commit Allowed]
    I -->|No| K[Block + Feedback]
Post-Edit Hook: Instant Quality Feedback
This hook runs after every file edit, providing immediate feedback:
---name:my-backenddescription:|FastAPI/SQLAlchemy patterns for this project. Use when working onbackend/ files: endpoints, services, models, schemas. Loads anti-patternrules automatically.---# Backend Development## Model Pattern```python
classUser(Base):__tablename__="User"__table_args__={'extend_existing':True}# REQUIRED
id:Mapped[str]=mapped_column(String(36),primary_key=True)
Anti-Pattern Checklist
No HTTPException in services - use DomainError
Money uses Decimal, never float
All DB operations are async
```
Critical: The description field in frontmatter is the trigger. Claude reads this to decide when to load the skill. Be explicit about when it should activate.
Progressive Disclosure
Skills use a three-level loading system to manage context:
graph TD
    A[Level 1: Metadata] -->|Always loaded| B[~100 words]
    C[Level 2: SKILL.md body] -->|When triggered| D[~5000 words max]
    E[Level 3: References] -->|As needed| F[Unlimited]

    B --> G[Claude decides to use skill]
    G --> D
    D --> H[Claude needs details]
    H --> F
This prevents context window bloat. Keep SKILL.md under 500 lines; move detailed patterns to references/.
Creating Skills with skill-creator
Use the /skill-creator skill to generate new skills:
/skill-creator Create a testing skill that covers pytest patterns,
Playwright E2E setup, and quality gates for our FastAPI + React project
The skill-creator will:
Ask clarifying questions about your testing patterns
Generate the skill structure
Create SKILL.md with proper frontmatter
Suggest reference files for detailed documentation
Essential Skills for Full-Stack Apps
Skill
Purpose
Triggers On
my-backend
FastAPI patterns, models, services
backend/*.py files
my-frontend
React patterns, hooks, i18n
frontend/src/*.tsx files
my-testing
pytest, Playwright, quality gates
Test-related requests
my-deploy
SSH, migrations, rollback
Deployment requests
my-anti-pattern
Code quality rules
Always loaded via other skills
5. Multi-Agent Architecture
Here’s where it gets powerful. Instead of one Claude doing everything, you orchestrate multiple agents with different strengths.
Model Strategy
Model
Use For
Why
Opus 4.5
Orchestration, review, complex reasoning
Highest quality, best at catching subtle issues
Sonnet 4.5
Bulk coding, routine implementations
Cost-effective, still excellent for defined tasks
graph TB
    User[User Request] --> Opus[Opus 4.5 Orchestrator]

    Opus --> |"Task(model=sonnet)"| S1[Sonnet: Backend]
    Opus --> |"Task(model=sonnet)"| S2[Sonnet: Frontend]
    Opus --> |"Task(model=sonnet)"| S3[Sonnet: Testing]

    S1 --> |Report| Opus
    S2 --> |Report| Opus
    S3 --> |Report| Opus

    Opus --> Review[Opus Reviews & Integrates]
    Review --> Response[Final Response]
The Invoke Pattern
Create skills that dispatch subagents with proper context:
---name:invoke-backenddescription:|INVOKE COMMAND: Use `/invoke-backend <task>` to spawn a Sonnet 4.5subagent for backend tasks. Automatically loads backend + anti-patternskills. Cost-effective for routine tasks.---# Invoke Backend Subagent## Dispatch Template
When invoked, dispatch:
Task(
subagent_type=”general-purpose”,
model=”sonnet”,
prompt=”””
You are a backend developer. Complete this task following all patterns.
Task
{user_task}
Required Skills (LOAD FIRST)
Read .claude/skills/my-backend/SKILL.md
Read .claude/skills/my-anti-pattern/SKILL.md
Mandatory MCP Tool Usage
Before edits: mcp__language-server-python__diagnostics
After edits: mcp__language-server-python__diagnostics
### Background Agents for Parallel Work

When tasks are independent, run them in parallel:

```python
# Main agent dispatches multiple subagents
Task(
  subagent_type="general-purpose",
  model="sonnet",
  run_in_background=True,  # Don't wait
  prompt="Implement the user service..."
)

Task(
  subagent_type="general-purpose",
  model="sonnet",
  run_in_background=True,
  prompt="Implement the user API endpoints..."
)

# Later, collect results
TaskOutput(task_id="agent-1", block=True)
TaskOutput(task_id="agent-2", block=True)
When to use:
Independent features that don’t share files
Testing while implementation continues
Code review alongside bug fixes
6. Quality Automation Pipeline
Tie everything together with a Makefile:
.PHONY:quality lint typecheck test-backend test-e2equality:lint typecheck test-backend@echo"All quality checks passed"lint:
docker exec backend poetry run ruff check app/ --fix
docker exec backend poetry run black app/
docker exec frontend npm run lint
typecheck:
docker exec backend poetry run mypy app/
docker exec frontend npx tsc --noEmittest-backend:
docker exec backend poetry run pytest -vtest-e2e:
npx playwright test
Playwright Configuration for Reliable E2E Tests
// playwright.config.tsexportdefaultdefineConfig({testDir:'./e2e/tests',fullyParallel:false,// Sequential for state-dependent testsworkers:1,retries:process.env.CI?2:1,use:{baseURL:'http://localhost',screenshot:'only-on-failure',video:'retain-on-failure',trace:'on-first-retry',},projects:[{name:'chromium',use:{...devices['Desktop Chrome']}},{name:'booking-flow',use:{...devices['Desktop Firefox']},retries:0,// No retries for deterministic flows},],});
7. Common Pitfalls & Anti-Patterns
Context Window Abuse
Problem: Loading everything into skills, never clearing context.
Solution:
Use /clear between unrelated tasks
Keep SKILL.md under 500 lines
Use progressive disclosure—references load on demand
As Anthropic notes: “Every time you start something new, clear the chat. You don’t need all that history eating your tokens.”
Agent Misuse
Problem: Using Opus for routine tasks; not enforcing quality in subagents.
Solution:
Opus orchestrates, Sonnet implements
Every subagent prompt includes MCP tool requirements
Subagents must report make quality results
Guardrail Gaps
Problem: Hooks that only warn, never block; missing secret detection.
Solution:
Block .env files unconditionally
Block commits with failing type checks
Log everything to .claude/logs/ for debugging
Skill Design Mistakes
Problem: README files in skills; duplicated information; deep nesting.
Solution:
Skills are for Claude, not humans—no README needed
Information lives in SKILL.md OR references, not both
Keep references one level deep from SKILL.md
8. Advanced Patterns We Haven’t Implemented (Yet)
Git Worktrees for Parallel Development
Run multiple Claude instances on isolated branches:
git worktree add ../project-feature-a feature-a
git worktree add ../project-feature-b feature-b
# Terminal 1: Claude works on feature-a# Terminal 2: Claude works on feature-b
This enables true parallel development without merge conflicts.
Headless Mode for CI/CD
Integrate Claude Code into your pipeline:
claude -p"Run all tests and fix any failures"\--output-format stream-json \--dangerously-skip-permissions
Warning: Only use --dangerously-skip-permissions in isolated containers.
Visual Iteration with Screenshots
Paste UI screenshots directly:
Take screenshot (Cmd+Ctrl+Shift+4 on macOS)
Paste into Claude Code (Ctrl+V)
“Make this match the design”
Screenshot result, iterate
Results improve significantly after 2-3 cycles.
Memory Snapshots for Session Continuity
Save context before complex sessions:
mkdir-p .claude/memory/snapshots
# Claude can write session state here# Load on next session to continue work
Extended Thinking for Complex Decisions
Use specific phrases to trigger deeper reasoning:
Phrase
Thinking Budget
“think”
Standard
“think hard”
Extended
“think harder”
Maximum
“ultrathink”
Unlimited
Example: “Think hard about the best way to implement this payment flow considering our existing architecture.”
Conclusion
You now have a blueprint for turning Claude Code into an autonomous development team:
Foundation: Docker Compose + CLAUDE.md give Claude a predictable environment
MCP Servers: Real-time type checking and documentation eliminate hallucinations
Hooks: Automated guardrails catch issues before they’re committed
Skills: Domain knowledge makes Claude an expert in your codebase
Multi-Agent: Opus orchestrates, Sonnet implements—optimized for cost and quality
The key insight? Claude Code isn’t just an assistant—it’s infrastructure. Treat it like you’d treat any other part of your development stack: configure it properly, enforce standards automatically, and iterate on what works.
Start with skills (they’re the highest ROI), add hooks (they prevent regressions), then scale with agents (for parallel work). Your future self will thank you.
Disclaimer: Content is accurate at the time of publication, however updates and new additions happen frequently which could change the accuracy or relevance. Please keep this in mind when using my content as guidelines. Please always test in a testing or development environment, I do not accept any liability for damages caused by this content.
I have been asked to design a course outline for teaching aspiring data scientists T-SQL, now for the last 5 years I have been leading a team of Data Specialists who’s bread and butter is T-SQL. But not most of them did not start out as specialists, but actually were hired with little or no previous data experience. So this should be easy right, I have helped at least 10 people in the last 3 years to become proficient in T-SQL. So where do one start, well I think there is many excellent paid and free courses out there in the wild, One for instance is an excellent video series by Kendra Little which you can find here.
But lets get back to the problem statement, how would one structure a course outline for the aspiring data scientist, who would probably spend most of their time in either R/Python or even Scala. With the expansion of Massive Parallel Processing environments like Azure Synapse, Redshift and many more for SQL or even Spark and Databricks environments for Data Analysis in Languages like R/Python or Scala. The need for super efficient code is no long that important, don’t get me wrong efficiency is still important, but can be added later.
Outline
Tools of the Trade
We need to decide if we want to store our data in our own environment where we are in full control of security, or move the data to the cloud where we do not have to focus on infrastructure and just the data and our data pipeline. We also need to have a look at what tools we want to use for exploring our data.
Cloud vs On-Premises
Cloud Options
1. Creating an Azure Account and a Azure SQL Database
On-Premises Options
Installing SQL Server Express/Developer Edition
Tools of the Trade (IDE)
SQL Server Management Studio
Azure Data Studio
Visual Studio Code
Spark SQL in Databricks
How to start writing code
Queries
Notebooks
Introduction to the basics of the T-SQL language
Starting of with the basics of the T-SQL language, how to filter the data we want to see. We will also look at the what is a database object.
In this module we will be working with multiple dataset and even make changes to the data which would persists
Working with multiple datasets
Joining datasets together
LEFT/RIGHT/FULL JOIN
SET operators
UNION/INTERSECT/EXCEPT/MINUS
Building basic Processes
Stored Procedures
Views
Data Modifications
Adding new rows
INSERT
IMPORT
Removing rows
DELETE
changing records
UPDATE
Analytical Functions
Window Functions
Pivot and Unpivot data
Analytical Aggregations
Common Table Expressions (CTE)
Disclaimer: Content is accurate at the time of publication, however updates and new additions happen frequently which could change the accuracy or relevance. Please keep this in mind when using my content as guidelines. Please always test in a testing or development environment, I do not accept any liability for damages caused by this content.
I recently decided to make to move from SSMS to Azure Data Studio due to the fun additional features is brings to the table. I enjoy Visual Studio Code and, my understanding is that Azure Data Studio is built on the same codebase. It is the small things that hooked me like Zen Mode, Source Control Integration and then Notebooks of coarse. I will be writing a post on Notebooks soon.
So today I want to show you how to add your own code snippets. I use INFORMATION_SCHEMA quite often to find a tables or a columns in our databases. So this is what code snippet we will be creating today.
Press “CTRL + SHIFT + P” to open the Command Pallet
Type “User Snippets” into the Command Pallet and Press “ENTER”
Now type “SQL” and Press “ENTER”
This will open “sql.json” file and this is where you will add the code below
"Find Object":{"prefix":"sqlInfo","body":["SELECT * FROM INFORMATION_SCHEMA.${1|COLUMN,TABLE|}S WHERE ${1|COLUMN,TABLE|}_NAME LIKE '%${2:Search}%'"],"description":"Find Object Information"}
Save the “sql.json” file and close it
Now we finally get to use our newly created code snippet, Open a empty sql script
Type in the prefix we define above “sqlInfo” and press tab
Now select Table/Column as per the list we defined in our code above, Select what you are looking for and press “TAB” and press “TAB” again to move to the search criteria.
Type the Table or Column Name you are looking for, then press “TAB” again to move out of the snippet context.
Disclaimer: Content is accurate at the time of publication, however updates and new additions happen frequently which could change the accuracy or relevance. Please keep this in mind when using my content as guidelines. Please always test in a testing or development environment, I do not accept any liability for damages caused by this content.
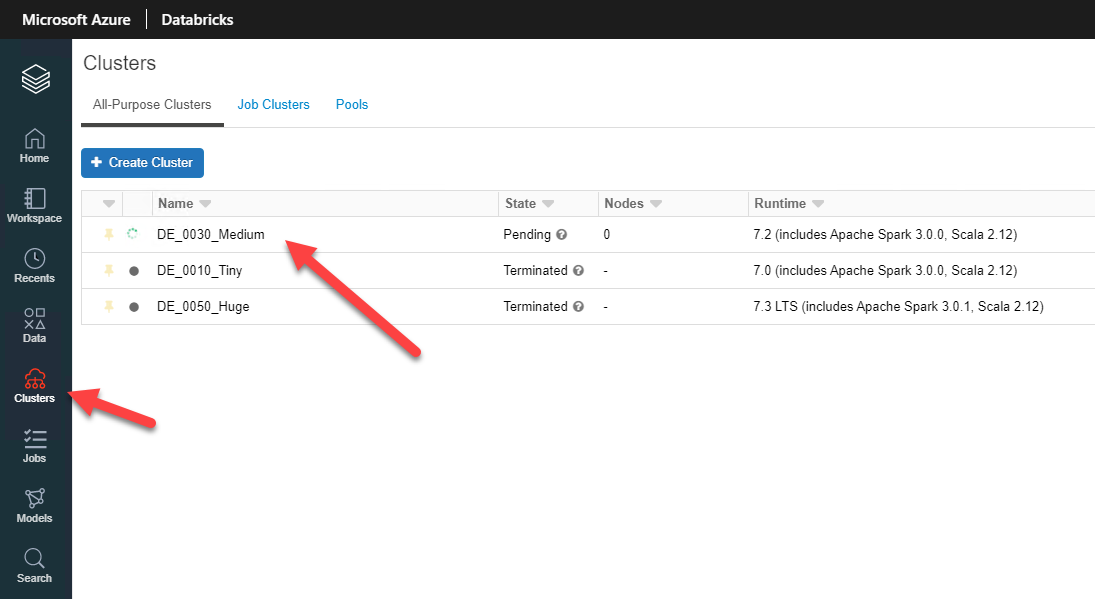
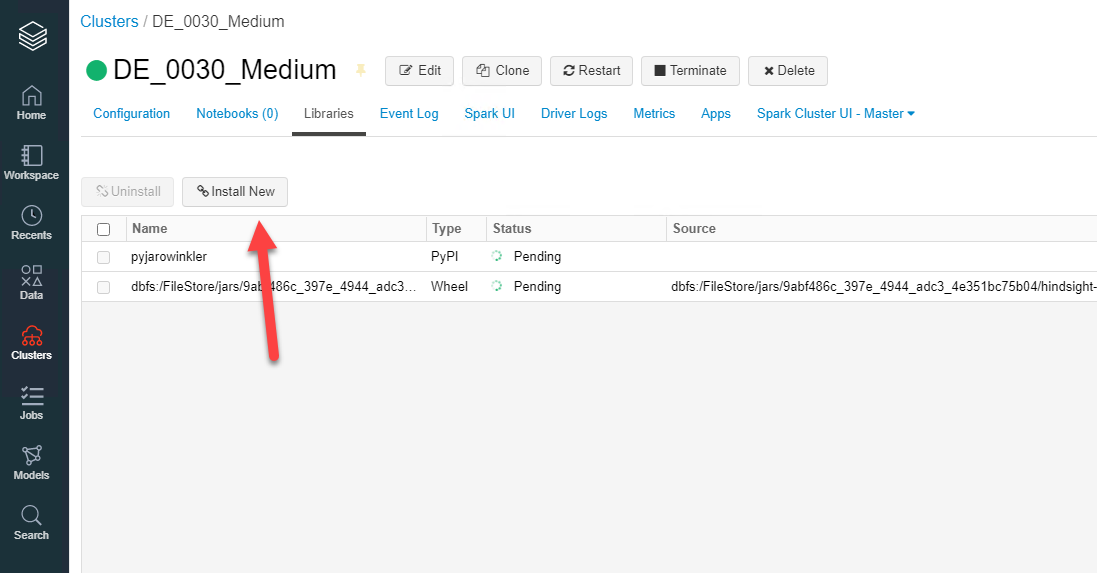
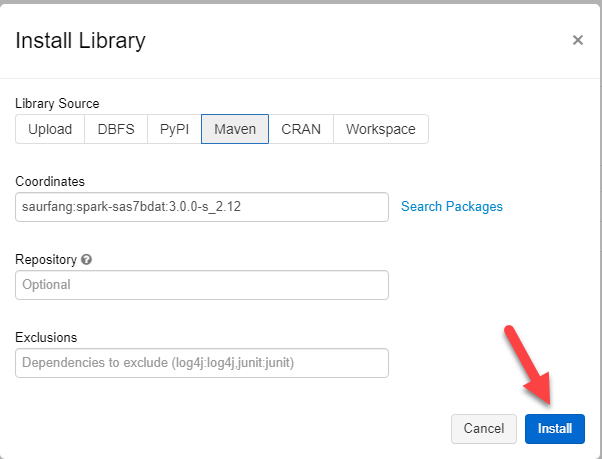
Working in an organization where we use so many different technologies, one of my biggest frustrations is working with SAS files (*.sas7dbat). These are relatively easy to read into SQL Server using the SAS ODBC Driver, but the majority of our workloads happen in either Azure Databricks or Azure Synapse. So I was on the lookout for a new and better way to get my data into Azure Databricks.
We can also achieve this with pandas.read_sas however, I wanted to leverage the power of MPP (Massively Parallel Processing). So eventually I found an awesome package created by Forest Fang, but took some fiddling to get this working for me.
Note, you have to mount your storage for this to work, below I have instructions in the links on how to mount Azure Storage. For the pandas and the spark package, you will have to have the storage mounted for it to work.
For me to save time as I get 100’s of these files at a given time, I wrote the below script to loop though my mounted storage point and import all of the files into a staging area on my Azure Synapse server.
for the df.write to work in the above code you will have to configure a few things for the “forwardSparkAzureStorageCredentials” to work, however on a quick work around you can use the below to set the keys in the current session only. You will also require a temporary storage place for Azure Synapse to read the data from, as behind the scenes it use the COPY statement to import the data into Azure Synapse.
For the recommended method please go through this article
Please do not save passwords and keys in your Notebooks.
Disclaimer: Content is accurate at the time of publication, however updates and new additions happen frequently which could change the accuracy or relevance. Please keep this in mind when using my content as guidelines. Please always test in a testing or development environment, I do not accept any liability for damages caused by this content.